
B
Brian Rinaldi
Guest
Progress Kinvey offers several ways to create your server-side business logic, the most powerful of which is FlexServices combined with the FlexService Runtime.
Almost every application requires some degree of server-side business logic. This could include anything from cleaning data going to or coming from the server, connecting to external, third-party APIs, or doing some complex, asynchronous processing that is best kept off the client (to name just a few examples).
Progress Kinvey offers several ways to create this sort of server-side business logic that runs in the cloud, but the most powerful of these is FlexServices combined with the FlexService Runtime. Using FlexServices, we can build complex business logic using JavaScript and Node.js, even leveraging the huge library of npm modules in our code. These services are developed locally and then can be deployed to the FlexService Runtime on Kinvey or even run as external Flex Services.
Sounds great, right? Well, the caveat is that developing and testing these can be a bit complex. For example, local testing requires that you stop and start the runtime each time you update your code. Plus, if you are interacting with data that lives in Kinvey, this data isn’t available in your local tests. Even still, once you deploy the code to the cloud, debugging can be limited—some errors don’t display in the most useful manner (showing up as a general business logic failure) and it’s not easy to see anything you may write to the console, which can be hugely useful during development (you’d need to check the Flex Service logs by running kinvey flex logs from the CLI and parsing through the responses).
Of course, you know there’s a solution, right? I mean, if there wasn’t this would be a terrible article. So without any further hesitation, let’s look at a productive FlexServices development setup.
To give credit where credit is due, many details that I cover in this article come from this knowledge base article by my colleague Ivo Janssen.
Part 1: nodemon
nodemon is a utility created by Remy Sharp that was originally designed to restart a Node server that had crashed. It is useful for our purposes in that it will also restart the service if it notices any file changes—making it a perfect for Node development.
The easiest way to use nodemon is to install it globally via npm.
npm install -g nodemon
nodemon can be installed locally as a development dependency if you prefer. Check the documentation for directions on how to use it in this manner.
nodemon offers a variety of options for starting your service—or you can just start it using the defaults. In our case, we’ll start the service and specify a port. While this isn’t necessary, per se, it makes it a little easier to manage port forwarding in the next step.
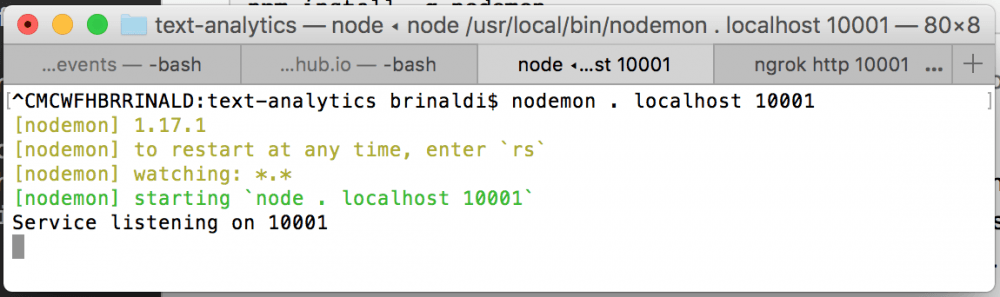
First, navigate to the directory where you are developing your FlexService, and run the following command (which uses port 10001, but feel free to change that as the port is up to you).
nodemon . localhost 10001
Your FlexService should now be running locally. You can already build and test locally using tools like Postman without doing any further steps. You will be able to test changes without restarting the service manually, but the limitation is that you do not have access to data and other variables within your Kinvey app.
Part 2: ngrok
ngrok is a tool and service that can simplify development and testing by making your local environment publicly accessible. It is a paid service with a number of features, but offers a free account that suffices for our purposes.
The first step, of course, is to download ngrok. Once you run it, you’ll need to connect it to your ngrok account—the tool will walk you through the process.
Note that since ngrok is a binary and there is no installation process, you’ll need to open your terminal/command prompt within the folder containing the binary to run it via ./ngrok. I find it easier to add it to my PATH so that I can access it from anywhere. The specific instructions for adding directories or executables to your PATH variable depend on your OS type and version.
Once ngrok is set up, you can start it up for HTTP port forwarding and ask it to use the same port that the nodemon service is running on (remember that above we set that to 10001).
ngrok http 10001
This will be ./ngrok http 10001 if you have not added ngrok to your PATH. Once the service starts, it will give offer details similar to below:
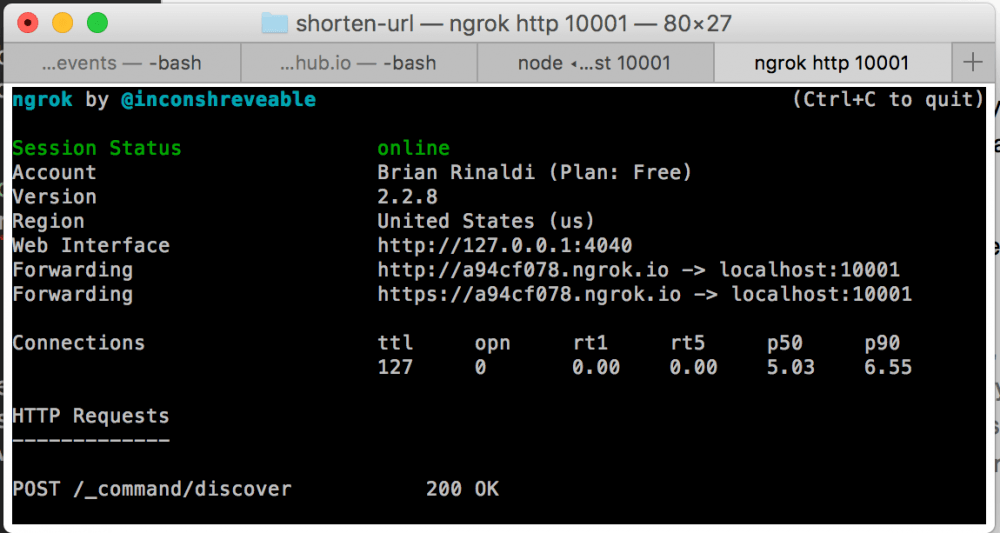
What we’ll need for the next step is the forwarding URL assigned by the ngrok service. In my example above that is https://a94cf078.ngrok.io, though keep in mind that this will change every time you stop and restart ngrok.
Part 3: External Flex
External Flex Services are intended to allow you to run a FlexService in Kinvey that is hosted on a third-party cloud or hosting provider or on your own server. The key here is that your own server in this case could be your local development environment that we’ve made accessible via ngrok.
In the Kinvey web console go to the Service Catalog and click the “Add a Service” button. Next choose “Flex” and then “External.”

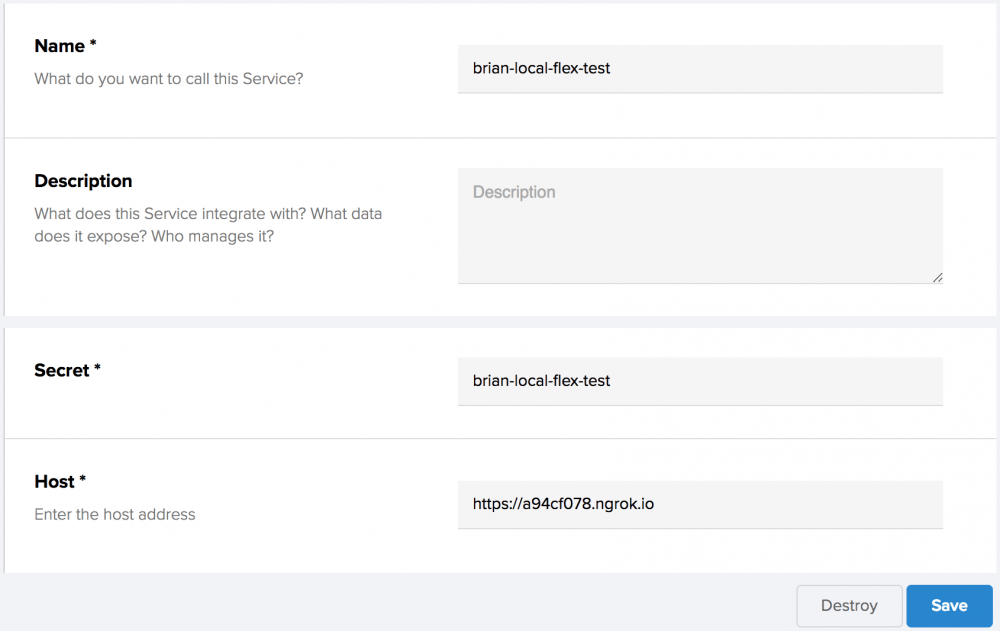
The form is pretty straightforward. You can name the service whatever you like, choose to apply it to a specific Kinvey app or to an organization, give it whatever secret you like (this really isn’t important since it is purely for local testing) and, finally, enter your ngrok forwarding URL as the “host.”
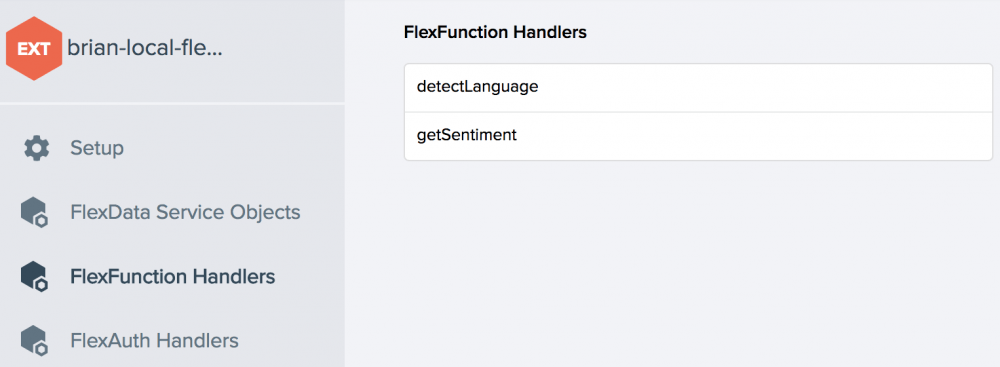
Once you have done this, you should be able to use Kinvey’s built in discovery to find any FlexData service objects, FlexFunction handlers or FlexAuth handlers within your service. For example, here’s one I am working on at the moment that has two FlexFunction handlers:
The next step depends on what type of FlexService you’ve created. Let’s walk through assign a custom endpoint as an example.
Connecting a Custom Endpoint to Your Local Server
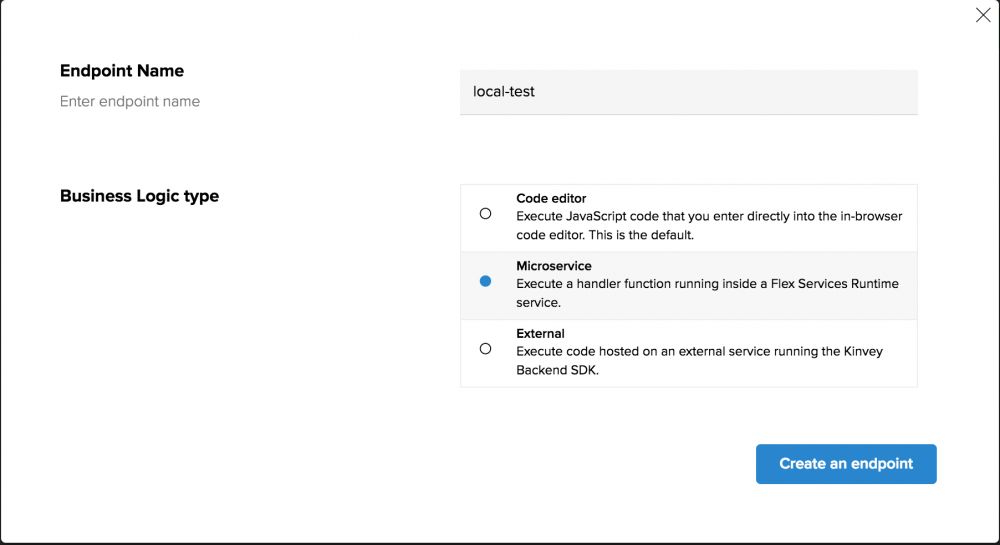
Within your Kinvey app, choose “Custom Endpoints.” Next choose “Add an Endpoint,” give the endpoint a name and then choose “Microservice.”
From there you should see the service you added earlier as well as the discovered FlexFunction handlers.

You can always edit this and switch to a different handler, so there is no need to redo this process if your service will have multiple handlers that you would like to test. In fact, if you are working on multiple FlexServices, as long as you run them using the same local port (10001 in my example), there’s also no need to recreate the service in the Service Catalog—just reuse the same local test service (of course, updating the “host” if you restart ngrok).
Other Options
You’ll follow a very similar process to test any handlers that are intended to be used as collection hooks (i.e. onPreSave, onPostSave, etc.). For FlexData, you’ll need to create the collection, choose “Use a Data Service” as the source and then choose the service from the options. Finally, for FlexAuth, you’ll navigate to “Mobile Identity Connect” via the console, press “Add Auth Service” and then select the “Flex Runtime” option, after which your service should appear within the Auth Service provider configuration form.
Part 4: API Console
Now that we’ve set everything up, it’s time to test our service. The easiest way to do this is to utilize the API Console built into the Kinvey web console.
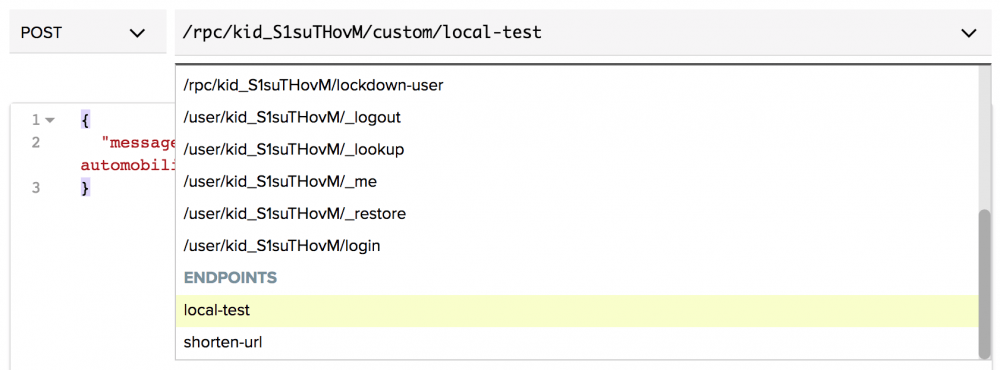
For example, to test a custom endpoint, simply choose it from the drop down. Keep in mind that all custom endpoints expect the request to be a POST.
If you have any errors or even console.log() calls in your code, the full details should appear in your local terminal/command prompt window/tab that is running nodemon.
To test a collection hook or FlexData service, simply use the API console to query the collection via GET/POST/PUT/DELETE calls.
Testing FlexAuth via the API console is a little different. Within the API console, choose “Show Options.”

Then choose “Change” to change from the default master secret authentication.

Choose Mobile Identity Connect in the modal window that opens.

Finally, click the “Login with Mobile Identity Connect” button.
Part 5: Go Home Early
Sure, the set up looks complicated, but that mostly because I am verbose—I have a special talent for turning even the easiest topic into a 100-page thesis. Just trust me that it is even easier than it looks here. And once you have everything set up, the development process becomes as simple as: make a code change -> test in the API console.
Once you are sure everything works properly, deploy your flex service. With all the time you saved in the development process, you might as well go home early!
Continue reading...
Almost every application requires some degree of server-side business logic. This could include anything from cleaning data going to or coming from the server, connecting to external, third-party APIs, or doing some complex, asynchronous processing that is best kept off the client (to name just a few examples).
Progress Kinvey offers several ways to create this sort of server-side business logic that runs in the cloud, but the most powerful of these is FlexServices combined with the FlexService Runtime. Using FlexServices, we can build complex business logic using JavaScript and Node.js, even leveraging the huge library of npm modules in our code. These services are developed locally and then can be deployed to the FlexService Runtime on Kinvey or even run as external Flex Services.
Sounds great, right? Well, the caveat is that developing and testing these can be a bit complex. For example, local testing requires that you stop and start the runtime each time you update your code. Plus, if you are interacting with data that lives in Kinvey, this data isn’t available in your local tests. Even still, once you deploy the code to the cloud, debugging can be limited—some errors don’t display in the most useful manner (showing up as a general business logic failure) and it’s not easy to see anything you may write to the console, which can be hugely useful during development (you’d need to check the Flex Service logs by running kinvey flex logs from the CLI and parsing through the responses).
Of course, you know there’s a solution, right? I mean, if there wasn’t this would be a terrible article. So without any further hesitation, let’s look at a productive FlexServices development setup.
To give credit where credit is due, many details that I cover in this article come from this knowledge base article by my colleague Ivo Janssen.
Part 1: nodemon
nodemon is a utility created by Remy Sharp that was originally designed to restart a Node server that had crashed. It is useful for our purposes in that it will also restart the service if it notices any file changes—making it a perfect for Node development.
The easiest way to use nodemon is to install it globally via npm.
npm install -g nodemon
nodemon can be installed locally as a development dependency if you prefer. Check the documentation for directions on how to use it in this manner.
nodemon offers a variety of options for starting your service—or you can just start it using the defaults. In our case, we’ll start the service and specify a port. While this isn’t necessary, per se, it makes it a little easier to manage port forwarding in the next step.
First, navigate to the directory where you are developing your FlexService, and run the following command (which uses port 10001, but feel free to change that as the port is up to you).
nodemon . localhost 10001
Your FlexService should now be running locally. You can already build and test locally using tools like Postman without doing any further steps. You will be able to test changes without restarting the service manually, but the limitation is that you do not have access to data and other variables within your Kinvey app.
Part 2: ngrok
ngrok is a tool and service that can simplify development and testing by making your local environment publicly accessible. It is a paid service with a number of features, but offers a free account that suffices for our purposes.
The first step, of course, is to download ngrok. Once you run it, you’ll need to connect it to your ngrok account—the tool will walk you through the process.
Note that since ngrok is a binary and there is no installation process, you’ll need to open your terminal/command prompt within the folder containing the binary to run it via ./ngrok. I find it easier to add it to my PATH so that I can access it from anywhere. The specific instructions for adding directories or executables to your PATH variable depend on your OS type and version.
Once ngrok is set up, you can start it up for HTTP port forwarding and ask it to use the same port that the nodemon service is running on (remember that above we set that to 10001).
ngrok http 10001
This will be ./ngrok http 10001 if you have not added ngrok to your PATH. Once the service starts, it will give offer details similar to below:
What we’ll need for the next step is the forwarding URL assigned by the ngrok service. In my example above that is https://a94cf078.ngrok.io, though keep in mind that this will change every time you stop and restart ngrok.
Part 3: External Flex
External Flex Services are intended to allow you to run a FlexService in Kinvey that is hosted on a third-party cloud or hosting provider or on your own server. The key here is that your own server in this case could be your local development environment that we’ve made accessible via ngrok.
In the Kinvey web console go to the Service Catalog and click the “Add a Service” button. Next choose “Flex” and then “External.”
The form is pretty straightforward. You can name the service whatever you like, choose to apply it to a specific Kinvey app or to an organization, give it whatever secret you like (this really isn’t important since it is purely for local testing) and, finally, enter your ngrok forwarding URL as the “host.”
Once you have done this, you should be able to use Kinvey’s built in discovery to find any FlexData service objects, FlexFunction handlers or FlexAuth handlers within your service. For example, here’s one I am working on at the moment that has two FlexFunction handlers:
The next step depends on what type of FlexService you’ve created. Let’s walk through assign a custom endpoint as an example.
Connecting a Custom Endpoint to Your Local Server
Within your Kinvey app, choose “Custom Endpoints.” Next choose “Add an Endpoint,” give the endpoint a name and then choose “Microservice.”
From there you should see the service you added earlier as well as the discovered FlexFunction handlers.
You can always edit this and switch to a different handler, so there is no need to redo this process if your service will have multiple handlers that you would like to test. In fact, if you are working on multiple FlexServices, as long as you run them using the same local port (10001 in my example), there’s also no need to recreate the service in the Service Catalog—just reuse the same local test service (of course, updating the “host” if you restart ngrok).
Other Options
You’ll follow a very similar process to test any handlers that are intended to be used as collection hooks (i.e. onPreSave, onPostSave, etc.). For FlexData, you’ll need to create the collection, choose “Use a Data Service” as the source and then choose the service from the options. Finally, for FlexAuth, you’ll navigate to “Mobile Identity Connect” via the console, press “Add Auth Service” and then select the “Flex Runtime” option, after which your service should appear within the Auth Service provider configuration form.
Part 4: API Console
Now that we’ve set everything up, it’s time to test our service. The easiest way to do this is to utilize the API Console built into the Kinvey web console.
For example, to test a custom endpoint, simply choose it from the drop down. Keep in mind that all custom endpoints expect the request to be a POST.
If you have any errors or even console.log() calls in your code, the full details should appear in your local terminal/command prompt window/tab that is running nodemon.
To test a collection hook or FlexData service, simply use the API console to query the collection via GET/POST/PUT/DELETE calls.
Testing FlexAuth via the API console is a little different. Within the API console, choose “Show Options.”
Then choose “Change” to change from the default master secret authentication.
Choose Mobile Identity Connect in the modal window that opens.
Finally, click the “Login with Mobile Identity Connect” button.
Part 5: Go Home Early
Sure, the set up looks complicated, but that mostly because I am verbose—I have a special talent for turning even the easiest topic into a 100-page thesis. Just trust me that it is even easier than it looks here. And once you have everything set up, the development process becomes as simple as: make a code change -> test in the API console.
Once you are sure everything works properly, deploy your flex service. With all the time you saved in the development process, you might as well go home early!
Continue reading...