
M
Mitch Shepherd
Guest
Learn how to deploy Progress MarkLogic Server on a Kubernetes cluster in seven quick steps.
Setting up a database on Kubernetes might sound complex, but with the right tools and approach, it can be surprisingly straightforward. In this blog post, we'll show you just how easy it is to deploy a powerful database solution like Progress MarkLogic Server on a Kubernetes cluster.
Read on to explore the steps, tools and best practices that make this process efficient and accessible. Whether you're new to Kubernetes or an experienced user, you'll discover the simplicity and flexibility of containerizing your database, enabling you to unlock the full potential of MarkLogic Server in a modern, containerized environment.
We'll start by discussing the MarkLogic Docker image and MarkLogic Helm chart—relevant elements for setting up your MarkLogic cluster configuration in Kubernetes. After that, we'll guide you through the process of setting up a MarkLogic Server cluster locally in your Kubernetes environment. For setting up a cluster locally in EKS for production, refer to the MarkLogic Documentation.
The MarkLogic Docker image facilitates the swift deployment of MarkLogic Docker containers. This purpose-built image is designed to enhance your experience in creating and managing MarkLogic clusters in Kubernetes. By leveraging Docker to encapsulate applications, developers gain a straightforward method to write, package and deploy applications with ease. These applications can then be deployed anywhere, whether in the cloud or on premises.
Key benefits to the MarkLogic Docker image include:
Incorporate the MarkLogic Server Docker image into your Kubernetes cluster setup, and witness a more seamless blend of speed, flexibility and enhanced security, all in one place.
Helm simplifies the deployment process by providing package repositories and search capabilities. The MarkLogic Helm chart streamlines the creation and management of MarkLogic clusters in Kubernetes, offering a new level of flexibility and cross-cloud compatibility. At the time of writing, the Helm chart has been thoroughly tested on Amazon EKS and Azure AKS, facilitating reliability across these cloud platforms. One of the significant advantages of using Helm for MarkLogic deployments is its cloud-agnostic nature. Whether you're on AWS, Azure or another Kubernetes-enabled cloud provider, the Helm chart provides a consistent interface for managing MarkLogic clusters.
Before we dive into MarkLogic and Kubernetes, you'll need some essential tools:
Start minikube using the following command, referencing Docker as the hypervisor to be used:
Then, pull the latest MarkLogic Server image from Docker Hub into minikube by running the following command:
This step helps you ensures check that your minikube cluster can use the MarkLogic image. You may want to ensure confirm minikube is up and running by, running the Kubernetes command line tool, KubeCTL:
Add the MarkLogic Helm repository to your local environment:
To help secure your MarkLogic cluster, create a Kubernetes secret for custom admin credentials. Replace the placeholders with your desired values in the following command:
With the most recent release of the MarkLogic Helm chart, users gain access to a powerful tool for orchestrating MarkLogic clusters. The Helm chart simplifies the process by allowing users to configure the cluster size, security settings and other essential parameters through a straightforward configuration file. Check out our documentation for a full list of Helm Chart Parameters.
Create a
Make sure to adjust the replicaCount and resource allocation to meet your requirements, setting it to any other odd number to avoid the split brain problem.
Check that the .yaml file is in your current directory, then install the MarkLogic Helm chart using the values.yaml file you created:
Verify the installation of the helm chart by running:
The installation may take a couple minutes to start each of the nodes.
You're almost done! To access your MarkLogic Server from localhost, you'll need to port forward requests:
Port forwarding essentially opens a tunnel between the pod and your laptop so you can connect to your pod or cluster.
Congratulations! You've successfully set up MarkLogic on Kubernetes locally. Now you're ready to explore your MarkLogic Cluster at http://localhost:8001. Remember, to sign in, you will need to enter the username and password selected in your Kubernetes secret from Step 5.
In the image below, you can see that three nodes have been created into a single cluster. At the top of the image, it shows that you are viewing the my-release-marklogic-0 node.
This is a great way to experiment, develop and test your MarkLogic applications before scaling them in production. As you become more comfortable with this setup, you can explore more advanced configurations and optimizations to tailor your MarkLogic cluster to your specific needs.
For more information on how to build upon this demo and prepare for scaling MarkLogic in production with Kubernetes, check out our MarkLogic Server on Kubernetes documentation.
Continue reading...
Setting up a database on Kubernetes might sound complex, but with the right tools and approach, it can be surprisingly straightforward. In this blog post, we'll show you just how easy it is to deploy a powerful database solution like Progress MarkLogic Server on a Kubernetes cluster.
Read on to explore the steps, tools and best practices that make this process efficient and accessible. Whether you're new to Kubernetes or an experienced user, you'll discover the simplicity and flexibility of containerizing your database, enabling you to unlock the full potential of MarkLogic Server in a modern, containerized environment.
We'll start by discussing the MarkLogic Docker image and MarkLogic Helm chart—relevant elements for setting up your MarkLogic cluster configuration in Kubernetes. After that, we'll guide you through the process of setting up a MarkLogic Server cluster locally in your Kubernetes environment. For setting up a cluster locally in EKS for production, refer to the MarkLogic Documentation.
MarkLogic Docker Image
The MarkLogic Docker image facilitates the swift deployment of MarkLogic Docker containers. This purpose-built image is designed to enhance your experience in creating and managing MarkLogic clusters in Kubernetes. By leveraging Docker to encapsulate applications, developers gain a straightforward method to write, package and deploy applications with ease. These applications can then be deployed anywhere, whether in the cloud or on premises.
Key benefits to the MarkLogic Docker image include:
- Multi-Layered Security: Easily deploy applications built on MarkLogic while supporting security at the application layer across deployed apps. No matter where your applications reside, MarkLogic helps to keep your data more secure.
- Rapid Deployment: Create and run MarkLogic on containers in mere seconds. Adapt to varying query capacity needs in near real time, enabling agility in your infrastructure.
- CI/CD Peace of Mind: Seamlessly integrate MarkLogic into your CI/CD pipeline. The Docker image facilitates rapid software development, supporting consistency and reliability throughout the continuous integration and continuous delivery process.
- Up to Date: The MarkLogic Server Docker image is fully supported by MarkLogic, and automated builds equip you with the latest updates. Trust in a solution designed to keep your data more secure while simplifying data integration, so you can build applications quickly.
Incorporate the MarkLogic Server Docker image into your Kubernetes cluster setup, and witness a more seamless blend of speed, flexibility and enhanced security, all in one place.
MarkLogic Helm Chart
Helm simplifies the deployment process by providing package repositories and search capabilities. The MarkLogic Helm chart streamlines the creation and management of MarkLogic clusters in Kubernetes, offering a new level of flexibility and cross-cloud compatibility. At the time of writing, the Helm chart has been thoroughly tested on Amazon EKS and Azure AKS, facilitating reliability across these cloud platforms. One of the significant advantages of using Helm for MarkLogic deployments is its cloud-agnostic nature. Whether you're on AWS, Azure or another Kubernetes-enabled cloud provider, the Helm chart provides a consistent interface for managing MarkLogic clusters.
Now, let’s get started!
Step 1: Set Up Required Tools
Before we dive into MarkLogic and Kubernetes, you'll need some essential tools:
- Docker: Install Docker to manage containers efficiently.
- Helm: Helm is a package manager that simplifies the installation of applications on Kubernetes.
- kubectl: This command-line tool is used to interact with your Kubernetes cluster.
- minikube: Minikube creates a local Kubernetes environment, perfect for development and testing.
- Browser: The latest version of a supported web browser. Check out the supported-browser list. We will be using Docker as the hypervisor for minikube in this walkthrough, but other options are also available.
Step 2: Set Up Minikube
Start minikube using the following command, referencing Docker as the hypervisor to be used:
minikube start --driver=docker Then, pull the latest MarkLogic Server image from Docker Hub into minikube by running the following command:
minikube image pull marklogicdb/marklogic-db:latest This step helps you ensures check that your minikube cluster can use the MarkLogic image. You may want to ensure confirm minikube is up and running by, running the Kubernetes command line tool, KubeCTL:
kubectl get nodes Expected Output: NAME STATUS ROLES AGE VERSION minikube Ready control-plane 1d v1.27.4 Step 3: Add the Helm Repo
Add the MarkLogic Helm repository to your local environment:
helm repo add marklogic https://marklogic.github.io/marklogic-kubernetes/ Expected Output: "marklogic" has been added to your repositories Step 4: Create a Secret for Custom Admin Credentials
To help secure your MarkLogic cluster, create a Kubernetes secret for custom admin credentials. Replace the placeholders with your desired values in the following command:
kubectl create secret generic ml-admin-secrets \ --from-literal=username='your-username' \ --from-literal=password='your-password' \ --from-literal=wallet-password='your-wallet-password' Expected Output: secret/ml-admin-secrets created Step 5: Create a values.yaml File
With the most recent release of the MarkLogic Helm chart, users gain access to a powerful tool for orchestrating MarkLogic clusters. The Helm chart simplifies the process by allowing users to configure the cluster size, security settings and other essential parameters through a straightforward configuration file. Check out our documentation for a full list of Helm Chart Parameters.
Create a
values.yaml file to configure your MarkLogic Server installation. Here's a simple example configuration for a three-node MarkLogic cluster:# Number of MarkLogic NodesreplicaCount: 3 # Set the admin credentials secret. Leave this out or set to blank "" to use the automatically generated secret.auth: secretName: "ml-admin-secrets" Make sure to adjust the replicaCount and resource allocation to meet your requirements, setting it to any other odd number to avoid the split brain problem.
Step 6: Install the Helm Chart
Check that the .yaml file is in your current directory, then install the MarkLogic Helm chart using the values.yaml file you created:
helm install my-release marklogic/marklogic --values values.yaml "my-release" can be any name of choice.Verify the installation of the helm chart by running:
kubectl get pods --watch Expected Output: NAME READY STATUS RESTARTS AGE my-release-marklogic-0 1/1 Running 0 64s The installation may take a couple minutes to start each of the nodes.
Step 7: Port Forward Requests
You're almost done! To access your MarkLogic Server from localhost, you'll need to port forward requests:
kubectl port-forward my-release-marklogic-0 8000 8001 8002 7997 Port forwarding essentially opens a tunnel between the pod and your laptop so you can connect to your pod or cluster.
Expected Output: Forwarding from 127.0.0.1:8000 -> 8000 Forwarding from [::1]:8000 -> 8000 Forwarding from 127.0.0.1:8001 -> 8001 Forwarding from [::1]:8001 -> 8001 Forwarding from 127.0.0.1:8002 -> 8002 Forwarding from [::1]:8002 -> 8002 Forwarding from 127.0.0.1:7997 -> 7997 Forwarding from [::1]:7997 -> 7997 Wrapping Up
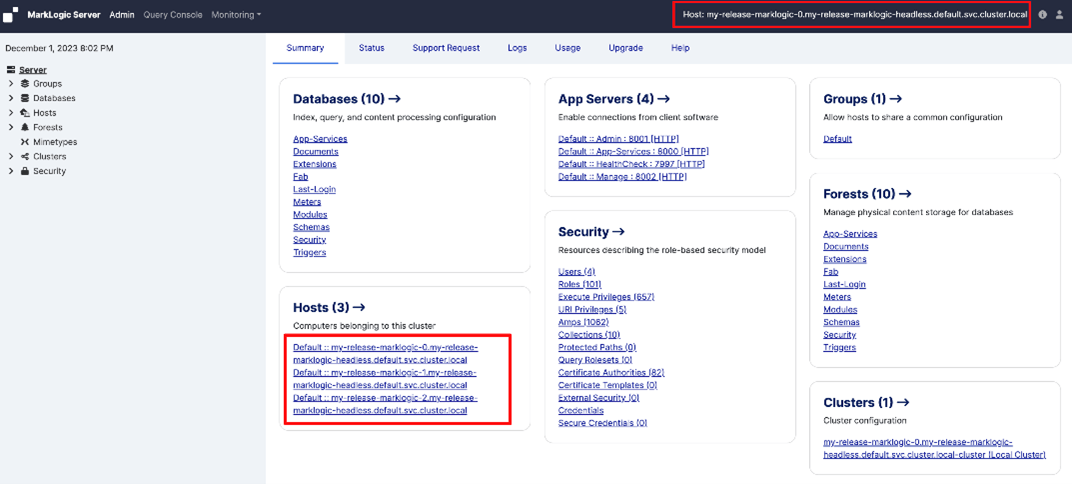
Congratulations! You've successfully set up MarkLogic on Kubernetes locally. Now you're ready to explore your MarkLogic Cluster at http://localhost:8001. Remember, to sign in, you will need to enter the username and password selected in your Kubernetes secret from Step 5.
In the image below, you can see that three nodes have been created into a single cluster. At the top of the image, it shows that you are viewing the my-release-marklogic-0 node.
This is a great way to experiment, develop and test your MarkLogic applications before scaling them in production. As you become more comfortable with this setup, you can explore more advanced configurations and optimizations to tailor your MarkLogic cluster to your specific needs.
For more information on how to build upon this demo and prepare for scaling MarkLogic in production with Kubernetes, check out our MarkLogic Server on Kubernetes documentation.
Continue reading...