
R
Rekiah Hinton
Guest
Many data scientists use Python and other adjacent tools (Jupyter Notebook, pandas, etc.) to manipulate and view data in their work. Python integrates with Progress MarkLogic to provide unique ways to access and manage data through MarkLogic Server. MarkLogic Server is a trusted multi-model database with built-in search functionality for creating value with complex data. MarkLogic provides a Client REST API to start using MarkLogic with little prior knowledge. By utilizing a few familiar tools, MarkLogic’s versatile technology makes it easy to use MarkLogic Server with any Python application.
In this post, we will learn how easy it is to interact with data in MarkLogic Server using Python scripts in Jupyter Notebook. We will also learn how to convert documents into rows to view data in a pandas DataFrame. Find the examples below in our GitHub repository for further reference.
Before you can begin, you must install:
Start a new notebook with the
In the first cell, run the following script:
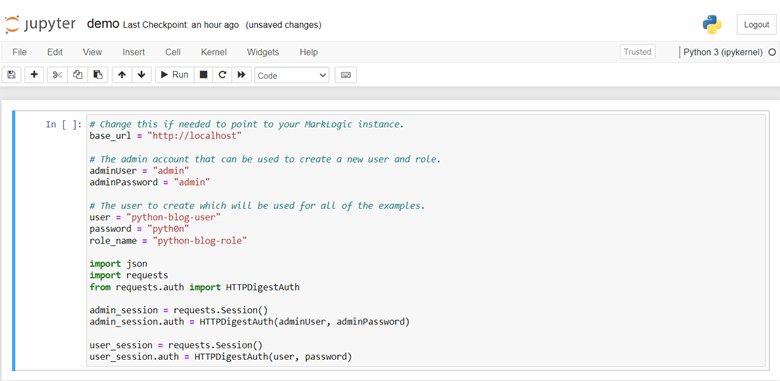
This script initializes a connection to the Server using the Python requests HTTP library. We will use this library to send several simple
Note: MarkLogic recommends changing the "
Next, run the following script:
This script sends a JSON message from the admin user to the Manage REST API. This creates a new role named "python-blog-role" which inherits several configurations necessary for the subsequent scripts in the procedure. While you can use the MarkLogic "admin" user, we encourage creating a user with fewer privileges for this kind of role.
Then, run the following script:

This script creates a new MarkLogic user named "python-blog-user."
To start interacting with the data, we must first add data.
Run this script:
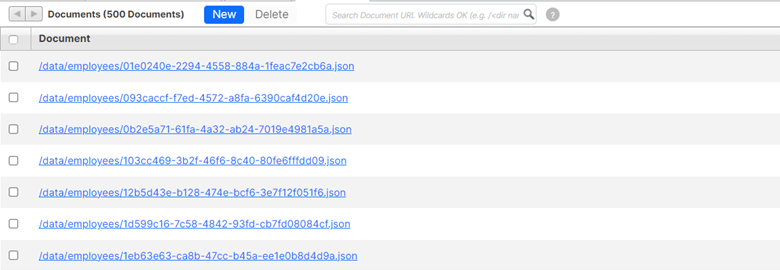
This script downloads a JSON file that contains 500 employee objects. Then, it loads each object as a new document in the database using the MarkLogic documents REST Service, a Client API for documents. The database collects these documents inside a MarkLogic collection, named "employee." Navigate to the Query Console to view the loaded documents. Switch the database field to "Documents" and click "Explore." The documents appear in the "Explorer" list.
MarkLogic Server can both store and query data. When MarkLogic stores new documents, it creates an index for immediate search. In a new cell, run the following query:
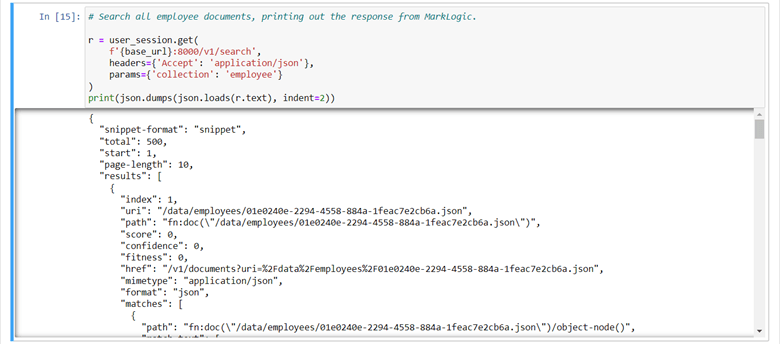
This query sends a search request for the collection "employee" to the MarkLogic search REST service (a Client API for queries), which returns a JSON result containing snippets of the first ten documents.
To make the query more specific, enter the following script:
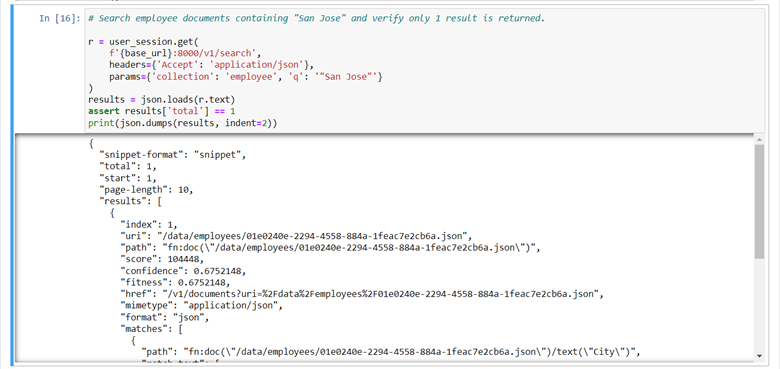
This query includes a search string with the "q" parameter and a value of "San Jose." This informs MarkLogic to only return results that contain the phrase "San Jose." This task does not require the user to configure anything in the Server itself. The ability to search for any text is part of the MarkLogic universal index, which is immediately available after loading data into the database.
The MarkLogic documents REST service allows the user to modify documents. Run the following script to alter the contents of a document:
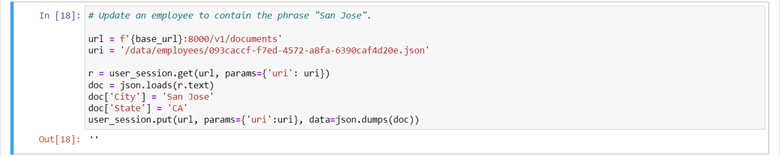
The document now contains the phrase "San Jose."
In a new cell, run the following script to search for "San Jose" to verify that the previous script modified the document:
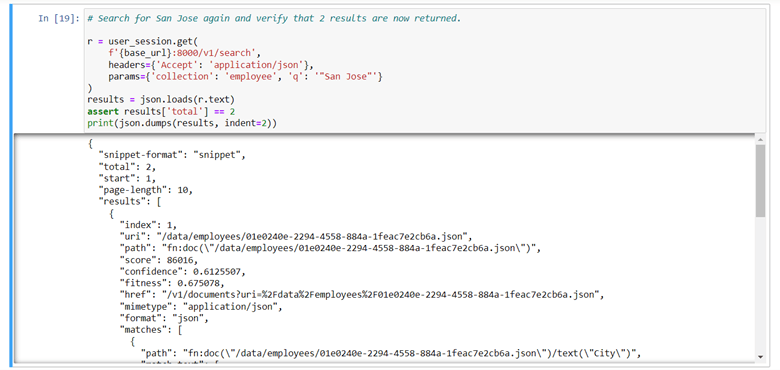
The query now returns two results with the phrase "San Jose."
While MarkLogic stores data as documents and the examples above interact with data as documents, many data analytics tools require data to be in rows. To utilize those tools, we must convert the documents into rows. MarkLogic’s Optic API supports this conversion by retrieving data as rows.
A common method in MarkLogic for projecting rows from documents is to create a view, which effectively creates an indexed table that the user can query via Optic or SQL. You can create a view using MarkLogic’s TDE Feature, which utilizes templates to model how the view should appear.
Run the following script to access this feature:
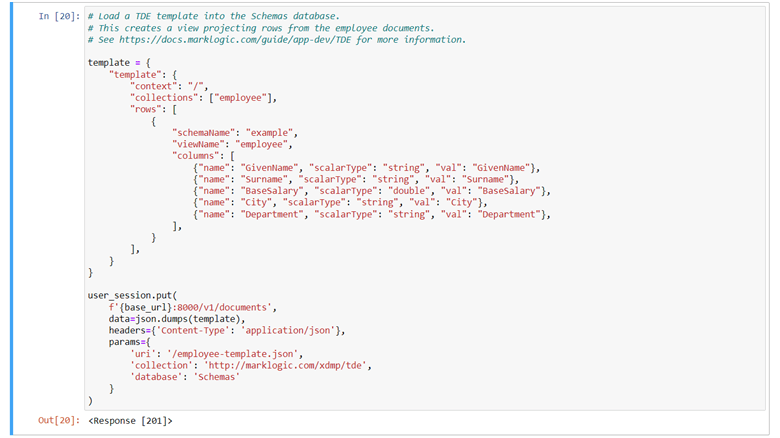
This script also uses the MarkLogic documents REST Service to load a JSON document, but this time, the document appears in the default "Schemas" database. Additionally, the document appears in a specific collection that informs MarkLogic that it is a TDE template that should be used to construct a view. Switch to the "Schemas" database to view the template:
Now that we have a view, we can query for rows. Run the following:
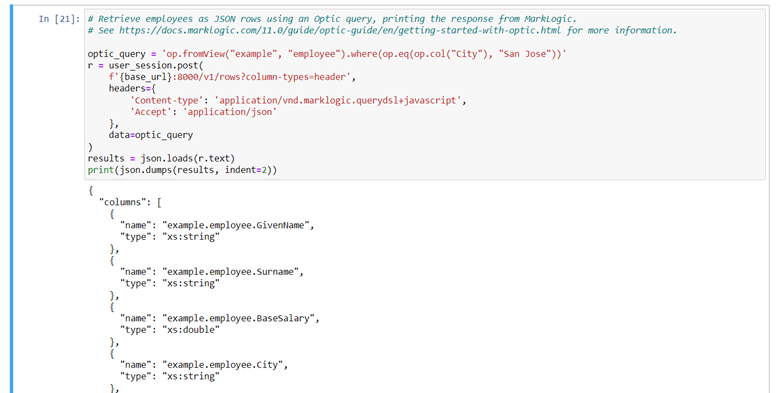
This script sends an Optic query to the MarkLogic rows REST Service (a Client API for rows) to select rows from the view where the "City" column in each row has a value of "San Jose."
The Python pandas library is a common tool for analyzing and manipulating data. The MarkLogic rows REST Service returns rows as a CSV, which is useful for creating a pandas DataFrame.
Run the following script:
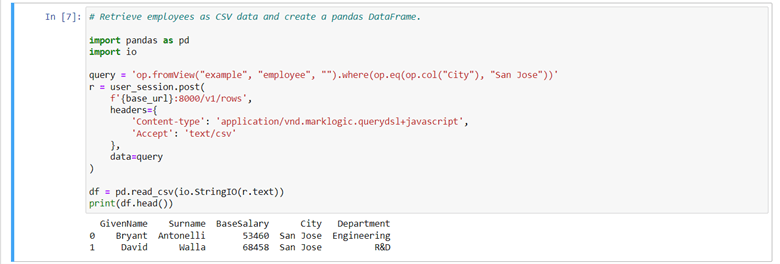
This script generates a DataFrame which appears below the cell. After the rows convert into a CSV, the pandas
The sample task above demonstrates how easy it is to use Python to interact with data in MarkLogic. Using familiar tools like Jupyter Notebook and pandas show how the user can build any Python application with MarkLogic. Developers and data scientists can use the Python
Continue reading...
In this post, we will learn how easy it is to interact with data in MarkLogic Server using Python scripts in Jupyter Notebook. We will also learn how to convert documents into rows to view data in a pandas DataFrame. Find the examples below in our GitHub repository for further reference.
Getting Started
Before you can begin, you must install:
- MarkLogic (Note: If you cannot install MarkLogic on your local machine, you can also launch a MarkLogic instance in AWS or run the server on Docker)
- Python 3
- Jupyter Notebook (Note: You can also access Jupyter Notebook through JupyterLab)
Create a New Notebook
Start a new notebook with the
jupyter notebook command from a terminal window. Open a new file:
In the first cell, run the following script:
This script initializes a connection to the Server using the Python requests HTTP library. We will use this library to send several simple
HTTP requests to the MarkLogic Manage REST API and the MarkLogic Client REST API. The ability to receive HTTP requests is a significant aspect of integrating Python development with MarkLogic.Note: MarkLogic recommends changing the "
base_url" and "adminPassword" values depending on the configuration of your Server.Create a MarkLogic Role
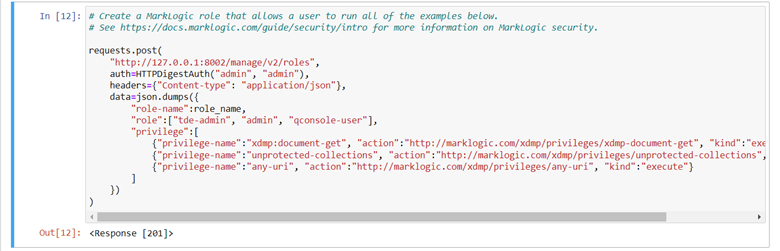
Next, run the following script:
This script sends a JSON message from the admin user to the Manage REST API. This creates a new role named "python-blog-role" which inherits several configurations necessary for the subsequent scripts in the procedure. While you can use the MarkLogic "admin" user, we encourage creating a user with fewer privileges for this kind of role.
Create a MarkLogic User
Then, run the following script:
This script creates a new MarkLogic user named "python-blog-user."
Load Data
To start interacting with the data, we must first add data.
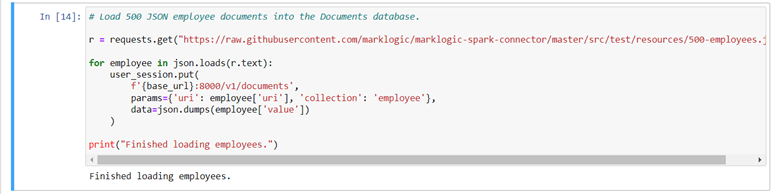
Run this script:
This script downloads a JSON file that contains 500 employee objects. Then, it loads each object as a new document in the database using the MarkLogic documents REST Service, a Client API for documents. The database collects these documents inside a MarkLogic collection, named "employee." Navigate to the Query Console to view the loaded documents. Switch the database field to "Documents" and click "Explore." The documents appear in the "Explorer" list.
Search Employee Documents
MarkLogic Server can both store and query data. When MarkLogic stores new documents, it creates an index for immediate search. In a new cell, run the following query:
This query sends a search request for the collection "employee" to the MarkLogic search REST service (a Client API for queries), which returns a JSON result containing snippets of the first ten documents.
To make the query more specific, enter the following script:
This query includes a search string with the "q" parameter and a value of "San Jose." This informs MarkLogic to only return results that contain the phrase "San Jose." This task does not require the user to configure anything in the Server itself. The ability to search for any text is part of the MarkLogic universal index, which is immediately available after loading data into the database.
Update The Data
The MarkLogic documents REST service allows the user to modify documents. Run the following script to alter the contents of a document:
The document now contains the phrase "San Jose."
In a new cell, run the following script to search for "San Jose" to verify that the previous script modified the document:
The query now returns two results with the phrase "San Jose."
Create a View
While MarkLogic stores data as documents and the examples above interact with data as documents, many data analytics tools require data to be in rows. To utilize those tools, we must convert the documents into rows. MarkLogic’s Optic API supports this conversion by retrieving data as rows.
A common method in MarkLogic for projecting rows from documents is to create a view, which effectively creates an indexed table that the user can query via Optic or SQL. You can create a view using MarkLogic’s TDE Feature, which utilizes templates to model how the view should appear.
Run the following script to access this feature:
This script also uses the MarkLogic documents REST Service to load a JSON document, but this time, the document appears in the default "Schemas" database. Additionally, the document appears in a specific collection that informs MarkLogic that it is a TDE template that should be used to construct a view. Switch to the "Schemas" database to view the template:
Query for Rows
Now that we have a view, we can query for rows. Run the following:
This script sends an Optic query to the MarkLogic rows REST Service (a Client API for rows) to select rows from the view where the "City" column in each row has a value of "San Jose."
Create a pandas DataFrame
The Python pandas library is a common tool for analyzing and manipulating data. The MarkLogic rows REST Service returns rows as a CSV, which is useful for creating a pandas DataFrame.
Run the following script:
This script generates a DataFrame which appears below the cell. After the rows convert into a CSV, the pandas
read_csv function creates a pandas DataFrame.Conclusion
The sample task above demonstrates how easy it is to use Python to interact with data in MarkLogic. Using familiar tools like Jupyter Notebook and pandas show how the user can build any Python application with MarkLogic. Developers and data scientists can use the Python
HTTP requests library to load and access data in MarkLogic with ease. They can also convert rows into CSV data to utilize the Python pandas library for any project. With the MarkLogic REST API to simplify loading and updating data, users experience a more efficient process overall and integrate any Python application with MarkLogic's data platform.Continue reading...