
S
Saikrishna Teja Bobba
Guest
Learn how to ingest data from Salesforce into MongoDB using StreamSets and the Progress DataDirect Saleforce JDBC driver.
StreamSets let you create complex data flows that can route and process data to your Big Data platforms from different sources easily, with negligible coding effort. And before you ask, yes, JDBC is one of the officially supported interfaces for StreamSets. It can be used either in the origin or destination of the pipeline that you can define for the Data Collector.
With Progress DataDirect JDBC drivers, anyone can ingest data from any data source across relational, Big Data, No SQL and SaaS sources using StreamSets. To get you started using our JDBC drivers with StreamSets, we put together this step-by-step tutorial. It demonstrates routing data from Salesforce to MongoDB by masking the data of fields that you may want to keep private.
Before You Start
Make sure you've followed the steps below before you proceed any further with this tutorial:

Run the Pipeline
Now that you have seen how you can use Progress DataDirect Salesforce JDBC driver with StreamSets to ingest your data into Big Data or No SQL, feel free to try ingesting data from other sources. You can use SaaS data sources like Eloqua, Google Analytics, Marketo, Big Data sources like Spark SQL, Cloudera CDH Hive, Amazon Redshift or No SQL data sources like MongoDB, Cassandra using our Progress DataDirect JDBC drivers and StreamSets. To learn more about the supported data sources by Progress DataDirect JDBC Connectors, please visit this informational page.
Try The Salesforce JDBC Driver Free
Continue reading...
StreamSets let you create complex data flows that can route and process data to your Big Data platforms from different sources easily, with negligible coding effort. And before you ask, yes, JDBC is one of the officially supported interfaces for StreamSets. It can be used either in the origin or destination of the pipeline that you can define for the Data Collector.
With Progress DataDirect JDBC drivers, anyone can ingest data from any data source across relational, Big Data, No SQL and SaaS sources using StreamSets. To get you started using our JDBC drivers with StreamSets, we put together this step-by-step tutorial. It demonstrates routing data from Salesforce to MongoDB by masking the data of fields that you may want to keep private.
Before You Start
Make sure you've followed the steps below before you proceed any further with this tutorial:
- Java is installed and the JAVA_HOME environment variable is set
- You've downloaded StreamSets and run it successfully after unzipping it
- MongoDB is installed on your machine, or you have existing MongoDB server connection details
- You have a Salesforce account (if not, register for one here)
- Download the DataDirect Salesforce JDBC driver
- To install the driver, execute the .jar package and by run the following command in terminal: java -jar PROGRESS_DATADIRECT_JDBC_SF_ALL.jar
- This will launch an interactive java installer, which you can use to install the Oracle JDBC driver to your desired location as either a licensed or evaluation installation
- Before we begin, let’s make sure that StreamSets can access the DataDirect Salesforce JDBC driver.
- In the install directory of Stream data collector run the following command:
mkdir -p libs-common-lib/StreamSets-datacollector-jdbc-lib/lib
- Copy the Progress DataDirect Salesforce JDBC driver from installdir/lib/sforce.jar to installdir_StreamSets/libs-common-lib/StreamSets-datacollector-jdbc-lib/lib
- Open the file libexec/sdc-env.sh and add the following line:
export STREAMSETS_LIBRARIES_EXTRA_DIR=libs-common-lib
- Restart the StreamSets Data Collector, if you have it running
- In the install directory of Stream data collector run the following command:
- Open the StreamSets application using your browser by visiting the URL http://<servername>:18630. If you are prompted for username and password, try the default username and password as “admin” and “admin.” If that doesn’t work, contact your administrator.
- On the home page, click on "Create New Pipeline" and when prompted give any name and save it. This will open the pipeline configuring page.
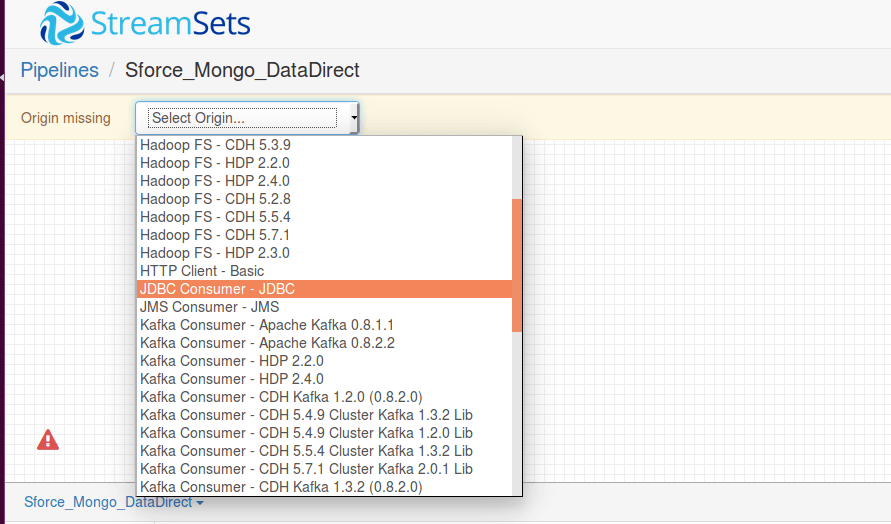
- On the pipeline configuration page, click on "Select Origin" drop down and choose JDBC consumer as your origin. The following is a screenshot for your reference:
- You should now see a new stage called JDBC Consumer 1 on your canvas. Click on "JDBC Consumer stage" and you should see a configuration menu.
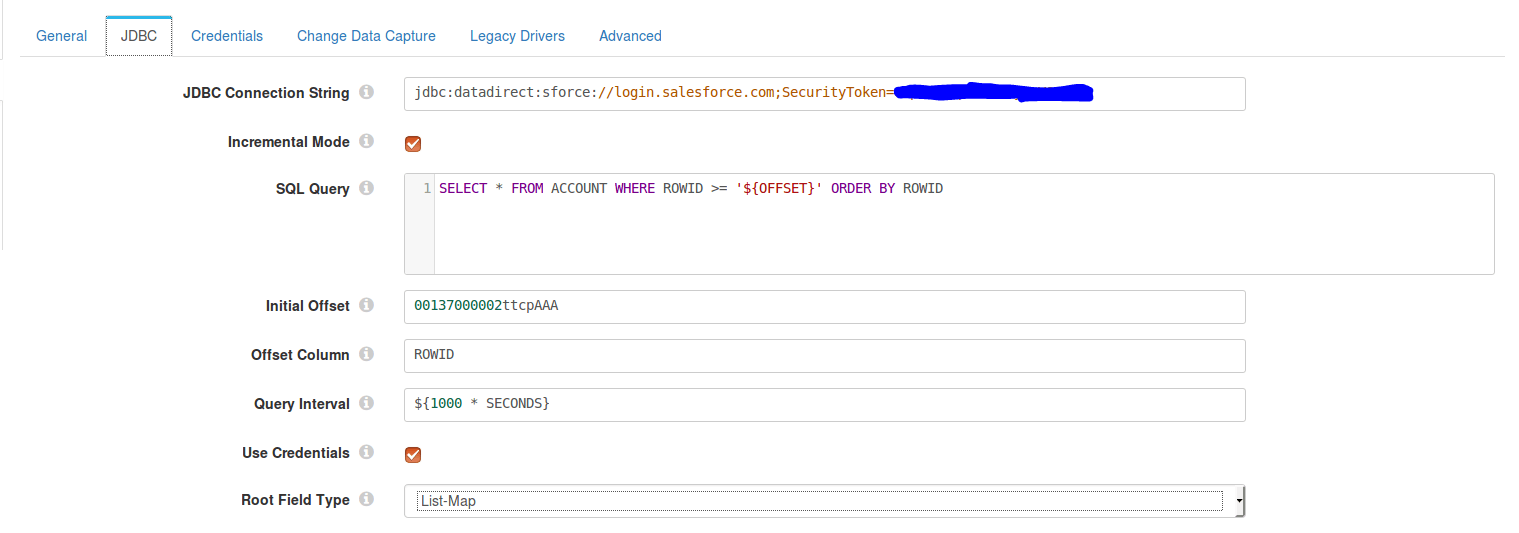
- Click on JDBC tab and configure it as follows:
- JDBC Connection String: jdbc:datadirect:sforce://login.salesforce.com;SecurityToken=<>
- SQL Query: This SQL query should have the offset column in its WHERE condition and ORDER BY. Below is a sample query that we used:
SELECT * FROM ACCOUNT WHERE ROWID >= '${OFFSET}' ORDER BY ROWID
where $OFFSET is the initial offset value
- Initial Offset: Initial value to insert for "$OFFSET"
- Offset Column: Column that the offset should be checked on
- Go to the Credentials tab and enter the credentials for your Salesforce account.
- Go to the Legacy Drivers tab and for the JDBC Driver class name field, fill it as com.ddtek.jdbc.sforce.SForceDriver. With this we are done configuring the JDBC consumer stage.
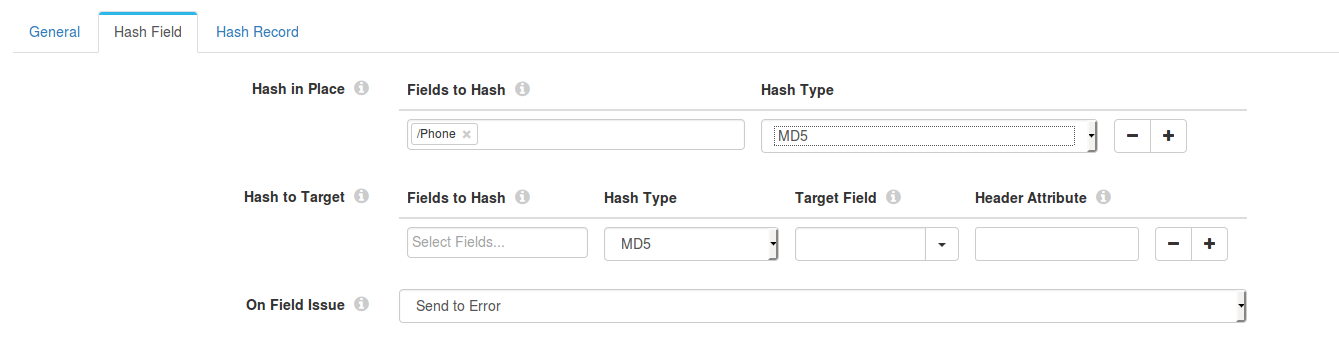
- To process the data that you are getting from Salesforce, you should add a processor stage. For the sake of this tutorial, let’s hash the values in some fields to protect privacy and to do that add a "Field Hasher – Basic" processor.
- In the configuration menu of the Field Hasher, go to the "Hash Field" tab. In the Fields to Hash under Hash in Place, enter the name of the field or column with forward slash as prefix. For example, ‘/PHONE’. Enter the same value for Target Field under Hash to target.
- Now that we have hashed the fields, we can choose our destination as MongoDB from the dropdown. But before that we need to notify the MongoDB stage of the type of operation you intend to do with the data fetched from Salesforce. The operation can be any of INSERT, UPDATE and DELETE.
- To do this, we will have to add an additional processor stage called "Expression Evaluator." Let’s do an INSERT into MongoDB as we don’t have anything in it. In the configuration menu of the Expression evaluator, under Expressions configure as follows:
- Header Attribute Expressions
- Header attribute: SDC.MONGODB.OPERATION
- Header Attribute Expression: INSERT
- Header Attribute Expressions
- Next, add the destination as MongoDB. In the Configuration menu, under the MongoDB tab, configure it as follows.
- Connection String: mongodb://<hostname>
- Database: <database name>
- Collection:<collection name>
- Next, click on canvas and you should see the pipeline configuration menu. Under the Error Record tab, set the Error Record field to "Write to File (Library: Basic)" and go to the tab "Error Records – Write" to file and enter the directory where you would like to save the error files.
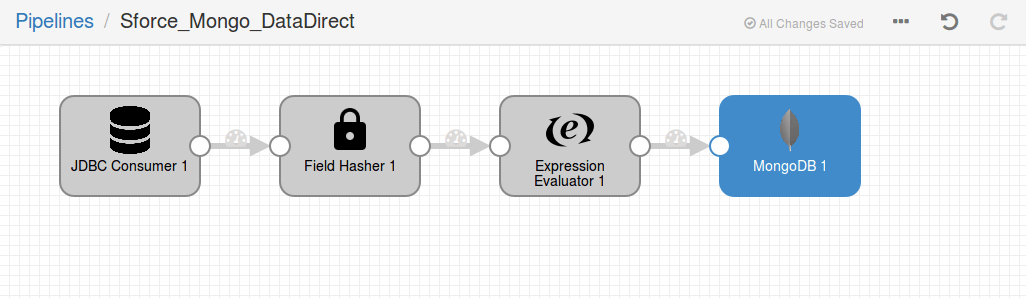
- With this we are done configuring the pipeline and ready to run the pipeline. Your pipeline should now look as below:
- To check if you have configured it properly, click on the Validate button on the pipeline options. I've included the screenshot below for anyone who having a hard time with the button.
Run the Pipeline
- To run the pipeline, click on the Run button located beside the Validate button that we showed earlier. This brings up various graphs showing you how many of these records are successful and how many failed, along with performance metrics as shown below:

- Check your MongoDB for the newly inserted data, which will have all the modifications that we made in the pipeline. In this case you would find hashed PHONE numbers instead of plain text.
Now that you have seen how you can use Progress DataDirect Salesforce JDBC driver with StreamSets to ingest your data into Big Data or No SQL, feel free to try ingesting data from other sources. You can use SaaS data sources like Eloqua, Google Analytics, Marketo, Big Data sources like Spark SQL, Cloudera CDH Hive, Amazon Redshift or No SQL data sources like MongoDB, Cassandra using our Progress DataDirect JDBC drivers and StreamSets. To learn more about the supported data sources by Progress DataDirect JDBC Connectors, please visit this informational page.
Try The Salesforce JDBC Driver Free
Continue reading...